After growing okra in my summer garden for more than three decades, I’ve come to appreciate just how rewarding this heat-loving vegetable can be—if you give it the warmth and space it craves. Whether I’m growing a towering row of ‘Clemson Spineless’ in a sunny raised bed or tucking dwarf varieties into containers on the patio, okra has earned its spot in my garden lineup.
Here’s everything I’ve learned from experience about how to grow okra successfully—from sowing seeds to harvesting crisp, tender pods.
Okra Basics
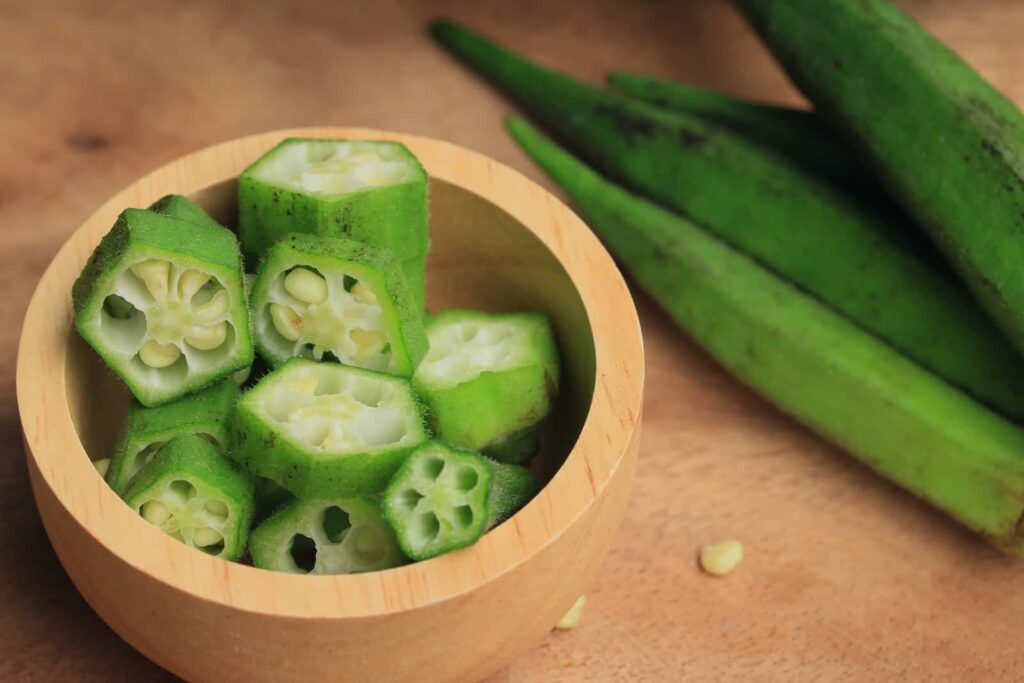
Okra is a tender, heat-loving annual best grown in very warm climates. It is grown for the peculiar, mucilaginous taste of its immature pods, commonly called gumbo.
Okra is primarily a tropical crop, but it can be grown where cucumbers or tomatoes are hardy. To produce the best, crop, however, it wants much summer heat and grows best south of zone 7.
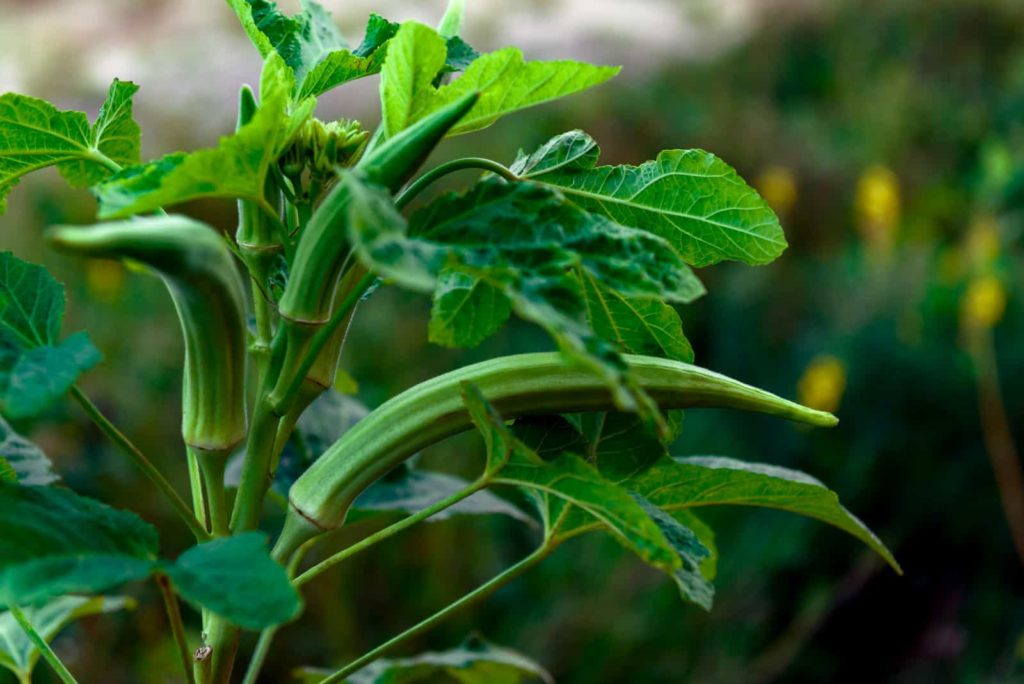
Okra is a tall, rank grower. It grows 4 to 7 feet (1.2-2.1m) tall and produces green and sometimes red seedpods which are harvested when 3 to 5 inches (7-12cm) long; shorter is better.
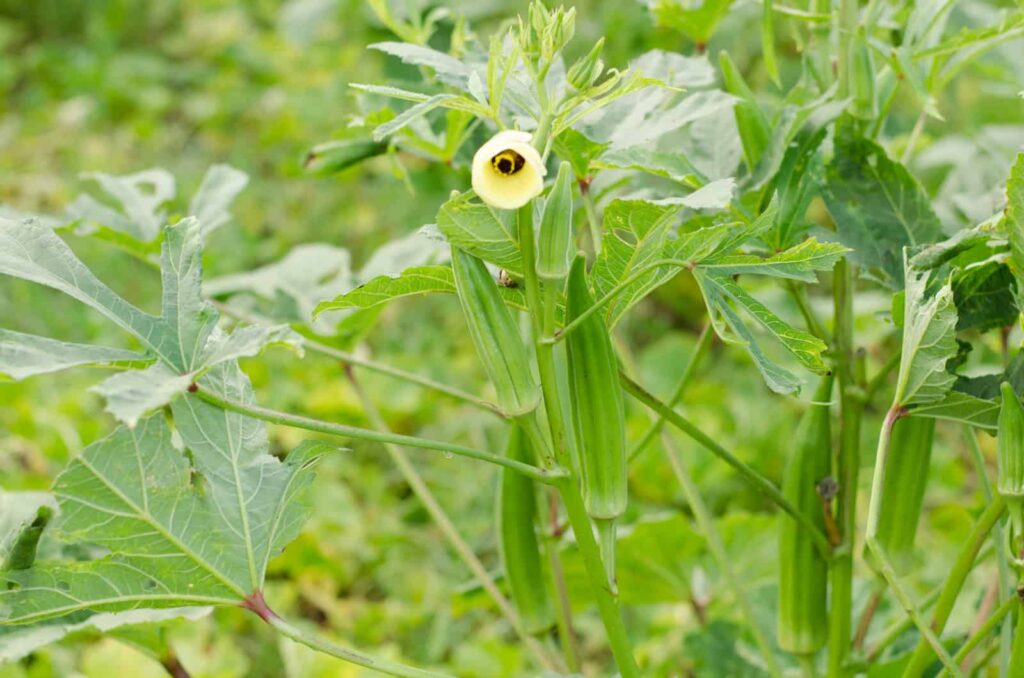
Okra has prickly stems, large maple-like leaves, and large, yellow flowers with red or purplish centers that closely resemble the hibiscus flower. Many southern gardeners plant okra in the flower garden for its beautiful flowers. Northerners will find okra difficult to grow.
Okra is successful in a variety of soil. It often requires no other attention than cultivation to keep down weeds. It grows best in sandy loam but it will grow in poor soil. Too much fertilizer will result in more leaves than pods.
Okra Quick Growing Tips
Okra won’t even think about growing until soil temperatures are warm and the air stays above 85°F (29°C) most days. It needs about 55 to 65 frost-free days of consistent warmth to fully leaf out, bloom, and produce tender pods. In my experience, trying to rush the season never pays off. I always wait until at least four weeks after the last frost to sow seeds directly into the garden. And when it comes to planting, I’ve found that six okra plants per person in the household is the sweet spot for regular harvests all summer long.
- Okra is a heat-loving annual plant that requires 55 to 65 frost-free days with temperatures consistently above 85°F (29°C) for full growth, flowering, and pod development.
- Sow okra seed in the garden 4 weeks after the average last frost date in spring.
- Yield: Grow 6 okra plants for each household member.
Where to Plant Okra
Okra absolutely needs full sun to thrive—anything less and you’ll end up with spindly plants and poor pod production. I’ve had the best success in loose, well-draining soil enriched with aged compost worked in early spring. In heavier soils that tend to hold water, I always add gypsum to help with drainage. Okra also prefers a slightly acidic pH, between 6.0 and 6.8, which I check each season to keep the soil in its comfort zone. And while it’s a heat-lover, okra is surprisingly sensitive to cold and wind, especially in northern gardens, I make sure to plant it in a warm, sheltered spot that gets full sun all day long.
- Plant okra in full sun.
- Okra grows best in loose, well-drained soil that is rich in organic matter.
- Add aged compost to planting beds in early spring in advance of planting and gypsum to soil that is slow draining.
- Okra prefers a soil pH of 6.0 to 6.8.
- Okra is very cold-sensitive, In northern gardens, give okra as much wind shelter as possible, but always full sun.
Okra Planting Time
Okra is one of the last crops I plant in spring, usually right around the same time I sow watermelon or summer squash. I wait until the soil is thoroughly warm, often using black plastic mulch to preheat my beds before planting. I direct sow okra about four weeks after the last expected frost, when daytime temperatures consistently stay above 85°F (29°C). That’s the sweet spot for okra to grow vigorously, flower, and produce tender pods. I’ve seen yields drop fast when temperatures dip below 70°F (21°C), so I never rush this crop into the garden. Patience and heat are the name of the game if you want a strong harvest.
- Okra is a heat-loving annual plant that requires 55 to 65 frost-free days with temperatures consistently above 85°F (29°C for full growth, flowering, and pod development.
- Plant okra after all danger of frost has passed in spring and in early summer.
- Direct sow okra seed in the garden 4 weeks after the average last frost date in spring. Pre-warm the soil ahead of planting with plastic mulch such as black plastic sheeting.
- Yields will decrease when the air temperatures fall below 70°F (21°C).
- Set out or plant okra seed at about the same time as you would watermelon or squash.
- Okra requires warm soil and almost tropical heat for the best growth.
Planting Okra
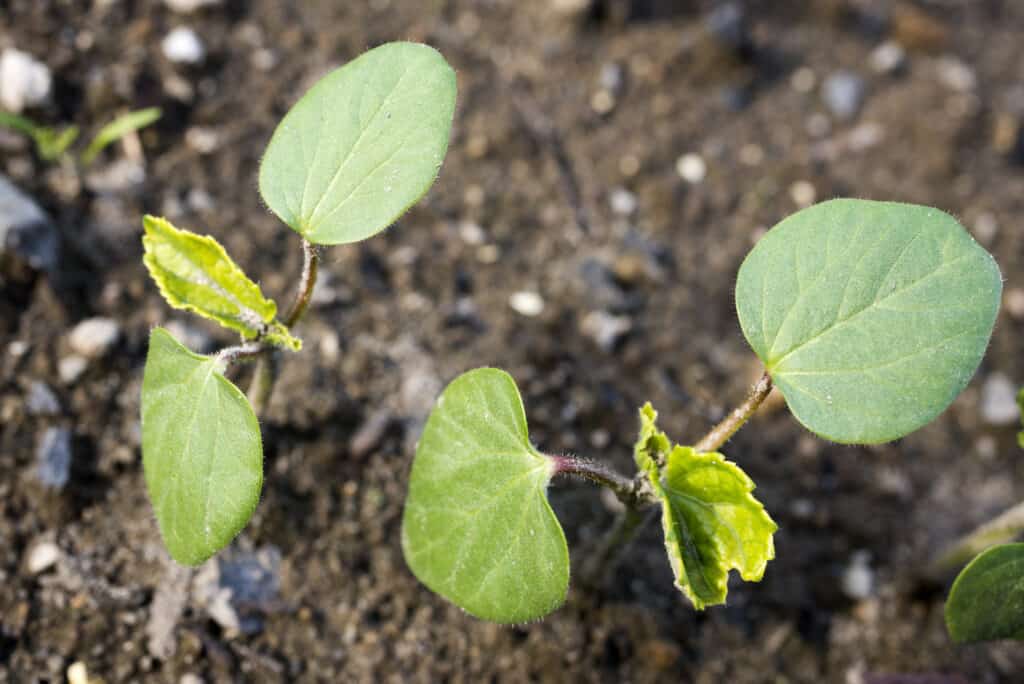
I’ve found that giving okra the right start makes all the difference. I always wait until the weather is truly warm and stable before planting—okra won’t tolerate cool soil. For the best germination, I pre-warm my garden beds with black plastic mulch and soak the seeds in warm water for a few hours before sowing; this softens their tough seed coats and speeds up sprouting. I plant the seeds about half an inch deep and space them 3 to 6 inches apart, knowing I’ll thin them later. Early on, I keep the beds weeded carefully, avoiding deep cultivation since okra roots are shallow. Once the plants take off and begin to shade the ground, the weeding slows down naturally—and that’s when I know the real growth is beginning.
- Plant okra in a warm climate when dependable warm weather has arrived.
- Optimal seed germination will occur when the soil temperature reaches 75°F; pre-warm the soil with black plastic mulch to speed germination.
- Soak okra seeds in tepid water several hours before you plant them; okra has a hard seed coat. Okra will be slow to sprout if you do not soak the seed before planting.
- Sow okra seeds ½ to 1 inch (2.5cm) deep; sow seeds 3 to 6 inches (15cm) apart.
- Space rows 24 to 36 inches (61-91cm) apart.
- Thin successful seedlings from 12 to 18 inches (30-45cm) apart.
- While plants are young, keep them weeded but do not cultivate them deeply because the roots can grow shallow. Once okra starts to cover the ground do not cultivate near it.
Planting Okra in Short-Season Regions
I have grown okra in short summer regions (Iowa and Massachusetts). Where summers are not long, I learned to give okra a head start indoors if I wanted a productive harvest. I started seeds indoors about 4 to 6 weeks before I planned to transplant them outside, using 2-inch peat pots so I wouldn’t disturb the roots later. I sowed three seeds per pot, just a quarter inch deep, and keep the starting mix warm—between 80° and 90°F—to ensure quick germination. Once the seedlings emerged, I thinned them to one strong plant per pot. In cooler climates, I’ve also had success growing okra in a heated greenhouse or under a plastic tunnel early in the season to give them the warmth they crave.
- Where the summer growing season is short or not hot, start okra seeds indoors 4 to 6 weeks before transplanting seedlings to the garden.
- Sow seed in 2-inch peat pots or plug grays, 3 seeds per pot a quarter inch deep. Keep the seed starting mix temperature at 80° to 90°F for fast germination.
- Thin to one plant per pot.
- Do not disturb the roots when transplanting.
- In cool regions, you can also grow okra in a heated greenhouse or plastic tunnel from early to mid-spring before setting plants outdoors.
Okra and Day Length
In my experience growing okra, I’ve noticed that day length plays a big role in when and how well the plants flower. Most okra cultivars are short-day plants, meaning they begin to flower more readily when the days are shorter—typically under 11 hours of daylight. When okra is grown during shorter days, it often starts flowering early in its growth cycle. However, as day length increases beyond that threshold, flowers may begin to abort before setting pods. This sensitivity to daylight is important to consider if you’re planting okra in a region with long summer days—timing your planting to align flowering with shorter days can help maximize pod production.
- Short-day lengths stimulate the flowering of most okra cultivars.
- Flowering begins at a very stage of growth at a day length of fewer than 11 hours; flowers tend to abort when days grow longer.
Okra Companion Plants
I’ve had great success pairing okra with other heat-loving garden vegetables. Basil, cucumbers, eggplant, melons, peppers, and southern peas all make excellent companions for okra. These plants thrive in similar warm-weather conditions and help make the most of your garden space. Basil can even help deter pests, while southern peas enrich the soil with nitrogen—giving your okra a helpful boost as it grows.
- Plant okra with basil, cucumbers, eggplant, melons, peppers, and southern peas.
Growing Okra in Containers
I’ve had success growing okra in containers, especially when space is tight or I want to move plants to the warmest, sunniest spots. Use a large container—at least 5 to 10 gallons—so the plant has plenty of room to develop a strong root system and reach full maturity. For best results, choose a dwarf or space-saving variety; even though the plants stay smaller, the pods are full-sized and just as productive. Make sure your container has good drainage, and keep the soil consistently warm and moist for the best yields.
- Okra can be grown in a large 5 to 10-gallon container; it needs plenty of room to grow to maturity.
- For permanent container planting, choose a dwarf variety (dwarf okra pods are the same size as standards).
- Choose spacing-saving varieties for container growing.
Watering Okra
In my experience growing okra in hot summer gardens, keeping the soil consistently moist early on is key to getting plants established and growing strong. Once okra is up and thriving, it actually prefers slightly drier conditions—too much water, especially in cool weather, can lead to stem rot. I give my plants about an inch of water a week during peak summer, which comes out to roughly 6.5 gallons.
- Keep okra evenly moist until established.
- Established plants can be kept on the dry side; stems rot easily in wet or cold conditions.
- In hot summer regions, give okra an inch of water each week; an inch of water is about 6.5 gallons.
Feeding Okra
When it comes to feeding, okra does best with balanced nutrition. I prep my beds with aged compost before planting, then side-dress with more compost or organic fertilizer as the season goes on. I’ve found that applying a complete organic fertilizer when the first pods form and switching to a high-potassium boost once the plants hit about four feet tall really helps production. A couple of rounds of fish emulsion—especially right after flowering—also gives okra the extra push it needs for strong yields.
- Okra needs a moderate amount of nitrogen, phosphorus, and potassium.
- Add aged compost to planting beds in advance of planting and as a side dressing any time during the season.
- Apply a complete organic fertilizer when the first pods. Apply a high potassium fertilizer when plants are about 48 inches tall.
- Fertilize okra twice during the growing season with fish emulsion; make one application just after flowering.
- Add gypsum if the soil is slow to drain.
Okra Care
Extra care goes a long way in keeping plants healthy and productive. I always keep the soil around my okra weed-free—competing weeds can quickly sap the moisture and nutrients okra needs to thrive, especially during hot spells. I place a sturdy stake next to each plant at planting time to support them as they grow tall and heavy with pods. Once my plants are about 9 inches tall, I pinch back the growing tips to encourage bushier growth and more branching, which leads to higher yields. One thing I’ve learned the hard way: wear gloves and old clothes when harvesting. The sticky sap from the pods can cling to fabric, and the tiny prickles on some varieties can irritate the skin or even cause allergic reactions. A little prep makes harvesting a lot more pleasant.
- Keep the soil weed free; weeds compete with okra for nutrients and soil moisture.a
- Place a stake next to the plant when planting.
- Pinch out growing tips when the plant reaches 9 inches (23 cm) tall or encourage bushy growth.
- Pods contain a sticky sap that may be difficult to remove from clothing or tools. Wear work clothes and gloves when working with okra.
- Prickles on pods can cause an allergic reaction.
Okra Pollination and Seed Saving
In my garden, I’ve found that okra is one of the easiest crops to grow for seed saving because it’s self-fertile and reliably pollinated by visiting bees and other insects. While cross-pollination can occur if other okra varieties are growing nearby—especially within a mile—it’s not something I worry about since okra tends to self-pollinate before insects even get involved. When I want to save seeds, I simply let a few pods mature fully on the healthiest plants. By late fall, those pods are dry, brittle, and sometimes over a foot long. I harvest them, crack them open, and store the seeds in a cool, dry place for planting next season. It’s a simple process that keeps my seed stock strong and true to type.
- Okra is a self-fertile, insect-pollinated annual.
- Cross-pollination is possible if any other okra species are within a mile, but it’s unlikely because of the okra’s self-fertilization.
- To save seeds, let pods stay on the chosen plant until they are completely mature, brown, brittle, and up to 12 inches long. In late fall, father the pods, break them open and remove the seeds. Store the seeds dry.
Okra Pests
Over the years, I’ve battled several common pests while growing okra, especially aphids, flea beetles, stink bugs, and corn earworms. Aphids cluster on tender growth and flower buds, sucking sap and weakening plants; I knock them off with a firm blast of water or introduce ladybugs to keep them in check. Flea beetles chew tiny holes in leaves early in the season, but I’ve had success using row covers when seedlings are young and vulnerable. Stink bugs and corn earworms can damage developing pods—picking them off by hand and spraying with neem oil helps reduce populations without harming beneficial insects. Regular monitoring and encouraging natural predators go a long way toward keeping okra pest problems under control in my warm, summer garden.
- Aphids, corn earworms, flea beetles, spider mites, and root know nematodes may attack okra.
- Flea beetles, aphids, and spider mites can be knocked off of leaves with a strong stream of water, or pinch out aphid-infested vegetation.
- Aphids leave sticky, sugary excrement called honeydew which attacks ants. Control aphids quickly.
- Stink bugs (Family Pentatomidae) are gray or green with shield-shaped backs; they suck juices from okra pods causing them to have a bumpy surface. Handpick and destroy these pests.
- Root-knot nematodes are soil-dwelling microscopic worms that enter plants through the roots. They can cause okra to grow slowly and leaves to droop even when the soil is moist. Add chitin to the soil, rotate crops, and solarize the soil in the off-season.
- Use collars around transplanted okra seedlings to protect against cutworms.
Okra Diseases
Okra is generally a tough crop, but I’ve encountered a few diseases, especially when the weather turns wet or the plants are stressed. Fusarium wilt and root rot are the most troublesome in my experience—especially in poorly drained soil. To prevent these, I always plant okra in raised beds amended with plenty of aged compost and avoid overwatering. Powdery mildew can appear in humid conditions; I space plants for good air circulation and apply a homemade spray of baking soda and water at the first sign of infection. Crop rotation is also key—I never plant okra in the same spot two years in a row to reduce soil-borne disease risk. With good garden hygiene and attention to plant health, okra can grow strong and productive all season.
- Okra is susceptible to verticillium and fusarium wilt which will cause plants to suddenly wilt, dry up, and die, usually in midsummer just as plants begin to produce. Yellow leaves and wilt are signs of fungal diseases. Remove infected plants and dispose of them in the trash.
- Keep the garden clean and free of debris. Remove and dispose of infected plants.
- Crop rotation will help prevent the buildup of soil-borne diseases.
See: Troubleshooting Okra Problems.
Harvesting Okra
Harvesting at the right time is key to getting tender, flavorful pods. I start checking the plants daily about 60 days after sowing, once flowering begins. I harvest pods when they’re 2 to 4 inches long—any longer, and they turn tough and woody almost overnight. The pods grow fast in heat, so it’s best to pick every day or two. I use a sharp garden knife or pruners to snip the pods cleanly at the stem, wearing gloves and long sleeves since some varieties have fine spines that can irritate the skin. Regular harvesting not only keeps the pods tender but also encourages the plant to keep producing for weeks.
- Okra is ready for harvest 55 to 65 days after planting.
- Okra bears pretty flowers before making fruit. A few days after the flowers, come the edible seed pods.
- Severely hot, dry weather or a harsh change in temperature, or poor drainage can cause bud drop. If growing conditions are right, green fuzzy finger-shaped pods will follow flowers. Some varieties bear flowers when only a foot high. Plants will continue to bear pods until the first frost.
- Cut seed pods with a garden pruner or sharp knife when they are 2 to 4 inches (5-10cm) long, not longer. Pods will be colored pale green, green, or purple. Smaller pods will be less gluey. Larger pods will become bitter, tough, and woody.
- Harvest pods at least every other day once flower petals fall and pods set; if pods are not picked and ripen to maturity the plant will stop producing. Use a sharp knife or pruning shears to cut pods from the plant.
- Wear gloves and long sleeves when harvesting okra to prevent potential skin irritation from prickles on pods.
- Okra will produce for a year if old pods do not remain on the plant or the plant is not killed by frost.
- Okra will stop producing if not picked continuously; if seeds are allowed to mature the plant will slow or stop its production of pods.
- Pods must be picked before seeds mature.
- When okra gets too tall to harvest, cut the plants down to about 18 inches. The plants will quickly grow up again and provide another crop.
More tips at How to Harvest and Store Okra.
Okra in the Kitchen
Okra pods are best enjoyed right after harvest, as they quickly become tough and woody if left too long. In the kitchen, I’ve steamed, sautéed, fried, and stewed okra in just about every way imaginable. It’s a staple in classic Southern dishes like Creole gumbo and jambalaya, and I especially love it simmered with tomatoes or dipped in tempura batter and fried. For a lighter dish, I’ll blanch the pods and toss them with chopped vegetables and a tangy vinaigrette. However you prepare it, okra is not only delicious but also packed with vitamins A and C and valuable antioxidants—making it a healthy and flavorful addition to summer meals.
- Use okra’s edible pods raw or cooked.
- Preserve or eat okra as soon as possible; pods will toughen quickly and turn woody if not used shortly after harvest.
- Okra can be steamed, boiled, sauteed, baked, deep-fried, braised or made into soup, or cut into a salad.
- Tender okra pods are an essential ingredient in Creole gumbo and jambalaya.
- Stew okra with tomatoes and rice, and add file powder at the last minute.
- Cook okra over low heat in a spicy sweet-and-sour sauce.
- Blanch and serve okra with chopped tomatoes, green onions, greens, and a vinegar-oil dressing.
- Dip okra in tempura batter and fry in deep fat.
- Boil okra pods in salted water until tender; drain and add butter, seasoning, and a dash of vinegar, and simmer until butter is absorbed.
- Okra is rich in vitamins A and C, as well as antioxidants.
Storing and Preserving Okra
For my money, the best way to enjoy okra is fresh from the garden, but it stores and preserves well if handled properly. Fresh okra pods will keep in the refrigerator for up to a week when stored in plastic bags at temperatures between 36 and 55°F. When I have an abundant harvest, I often freeze okra—just trim the stems (without cutting into the pods), blanch them for 2 to 3 minutes, cool quickly in an ice bath, and freeze either whole or sliced. Drying okra is another reliable method; I like to string the pods on thread and hang them in a shady, well-ventilated spot, bringing them in at night to avoid moisture. You can also dry them in full sun over a couple of days. Pickling is a flavorful option too, especially if you enjoy okra’s tangy crunch in salads or as a side dish. With a little planning, you can enjoy homegrown okra long after the season ends.
- Okra is best used fresh or pickled.
- Pods will keep in the refrigerator for 7 days at 36 to 55°F. Keep refrigerated pods in plastic bags.
- You can also freeze, can, or dry okra pods.
- Okra freezes well. Trim off the stems, but do not cut into the pods. Steam-blanch for 2 or 3 minutes, and chill. Leave them whole or slice them. Package and freeze.
- Dry pods by stringing them on a thread and hanging them to dry. Hand the strings in an airy but shady place until fired. Okra can be dried on a dray in full sun; it takes a day or two to dry okra. Bring pods indoors at night.
Okra Varieties to Grow
When choosing an okra variety, consider your climate, garden space, and taste preferences. Two top-performing green-pod favorites are ‘Blondie’ and ‘Clemson Spineless,’ both known for reliable yields and excellent flavor. For cooler climates or shorter growing seasons, ‘Cajun Delight’ is a great early producer. If you’re looking to add visual interest, ‘Burgundy’ and ‘Red Velvet’ offer striking red pods and stems. In small-space gardens or containers, dwarf varieties like ‘Baby Bubba,’ ‘Dwarf Green Long Pod,’ and ‘Perkins Dwarf Spineless’ thrive while still producing full-sized pods. For quick harvests, try early maturing varieties like ‘Annie Oakley,’ ‘Jade,’ or ‘Emerald.’ If you’re curious about unusual shapes or heritage varieties, ‘Star of David’ produces thick, meaty pods and brings a touch of history to your plot.
- Recommended okra varieties: ‘Blondie’ and ‘Clemson Spineless’ which are top-performing favorites. ‘Cajun Delight’ is a short-season variety good for cooler climates. ‘Burgundy’ and ‘Red Velvet’ have red pods and stems. ‘Baby Bubba’ is a dwarf variety for small spaces.
- Green pod okra: ‘Annie Oakley’ (57 days); ‘Clemson Spineless’ (55 days); ‘Gold Coast’ (75 days); ‘Jade’ (55 days); ‘Perkins Long Pod’ (60 days).
- Space savers: ‘Dwarf Green Long Pod’ (50 days); ‘Emerald’ (56 days); ‘Perkins Dwarf Spineless’ (53 days).
- Other colors: ‘Blondie’ (50 days); ‘Burgundy’ (60 days); ‘Red Okra’ (60 days); ‘Star of David’ (61 days).
About Okra
- Common name. Okra, lady’s fingers
- Botanical name. Abelmoschus esculentus or Hibiscus esculentus
- Family: Malvaceae (hibiscus family; okra is an edible relative of hibiscus and cotton)
- Type of plant: Warm-season annual
- Origin. Africa
Related Okra Articles:
🥬 Start Here
🌱 Planning & Planting
- When and Where to Plant Okra In Your Garden
- How to Successfully Grow Okra in Short Summer Regions
- How Day Length Affect Okra Growth-What You Can Do About It
- How to Grow Okra in Containers: Tips from My Garden
- How to Plant Okra: Step-by-Step Guide
🌿 Care & Maintenance
🧬 Varieties & Selection
🛠️ Troubleshooting & Problem Solving
🥬 Harvest & Kitchen Use
Garden Planning Books at Amazon:
- Vegetable Garden Almanac & Planner
- Kitchen Garden Grower’s Guide Vegetable Encyclopedia
- Vegetable Garden Grower’s Guide
- Tomato Grower’s Answer Book
More how to grow tips:
Learn how to plant, grow, and harvest your favorite vegetables. Click below for all you need to know.
- Artichoke
- Arugula
- Asparagus
- Beans, Snap
- Beets
- Broad Beans
- Broccoli
- Brussels Sprouts
- Cabbage
- Cantaloupe — Melons
- Cardoon
- Carrots
- Cauliflower
- Celeriac
- Celery
- Chard
- Chayote Squash
- Chickpeas
- Chicory
- Chinese Cabbage
- Collards
- Corn Salad
- Corn, Sweet
- Cresses
- Cucumbers
- Eggplant
- Endive and Escarole
- Fava Beans
- Florence Fennel
- Garbanzo Beans
- Garlic
- Horseradish
- Jerusalem Artichoke
- Kale
- Kohlrabi
- Leeks
- Lettuce
- Lima Beans
- Melons
- Mizuna
- Mustard Greens
- New Zealand Spinach
- Okra
- Onions
- Parsnips
- Peanuts
- Peas
- Peppers
- Potatoes
- Pumpkins
- Radicchio
- Radishes
- Rhubarb
- Rutabaga
- Salsify
- Shallots
- Sorrel
- Southern Peas
- Soybeans
- Spinach
- Squash, Summer
- Squash, Winter
- Sunchokes
- Sweet Potato
- Swiss Chard
- Taro
- Tomatillo
- Tomatoes
- Turnips
- Watermelon
- Zucchini