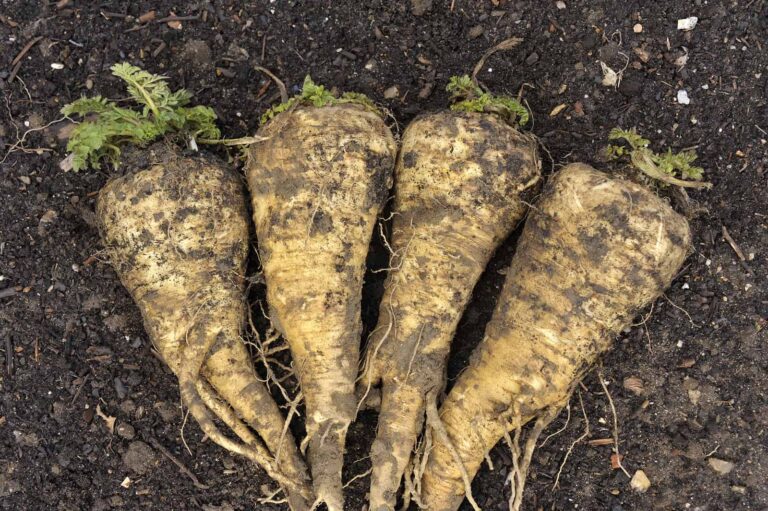
How to Harden Off and Transplant Celeriac Seedlings
Hardening off and transplanting are two of the most important steps in growing healthy celeriac. Over decades of raising cool-season crops in Sonoma Valley, I’ve learned that celeriac responds best when the transition from protected indoor conditions to the outdoor garden happens slowly and intentionally. Rushing this process leads to shock, stalled growth, and—most importantly—small roots. A careful transition sets the plant up for a full, flavorful bulb by harvest time.
Why Hardening Off Matters for Celeriac
Celeriac seedlings grown indoors enjoy steady warmth, humidity, and controlled light—conditions the outdoor garden never perfectly replicates. Moving them directly outside without preparation can cause leaf scorch, wilting, or transplant shock. I’ve found that celeriac needs a full week, sometimes ten days, to adjust to sun, wind, and cooler night temperatures.
How I Harden Off Celeriac Seedlings
Here’s the method I’ve refined over years of trial and error:
Day 1–2: Bright shade
Place seedlings outdoors for 2–3 hours in bright shade or dappled light. Bring them back inside at night.
Day 3–5: Light morning sun
Give seedlings morning sun and afternoon shade for 3–4 hours. Increase time outdoors to most of the day.
Day 6–7: Half-day sun
Let plants experience direct sun in the morning and early afternoon. Bring them in only if nights dip below 45°F.
Day 8–10: Full days outdoors
Before transplanting, seedlings should spend at least two full days and nights outside (weather permitting).
Gradually increasing exposure minimizes stress and produces sturdy, compact growth—essential for a good celeriac root.
Transplanting: Timing and Technique
I transplant celeriac on an overcast morning or late afternoon. Harsh midday sun can stress tender seedlings. Over the years, I’ve learned these key practices make the biggest difference:
- Plant slightly deeper than the seedling grew in its tray, but not so deep that the crown is buried.
- Space generously—about 8–10 inches apart—to give each plant room to swell into a full-sized bulb.
- Firm the soil gently to eliminate air pockets without compacting the bed.
- Water deeply immediately after planting, then keep soil consistently moist for the first two weeks.
Celeriac responds best to stable conditions. Early moisture stress or heat shock will reduce root size later.
Protecting Seedlings After Transplanting
In my garden, wind and sudden temperature spikes can set back celeriac seedlings. I often use a light layer of shade cloth or row cover during the first week outdoors. This simple step helps plants establish strong root systems before facing full sun and warm afternoons.
Bottom Line
Celeriac grows slowly, and the early stages determine your final harvest. Harden seedlings off gradually and transplant with care, and you’ll set the foundation for large, smooth, aromatic roots that store beautifully and taste even better.
Celeriac Learning Hub
Start here: How to Plant, Grow, and Harvest Celeriac: A Complete Guide
Celeriac Planting & Growing Basics
- Best Soil for Celeriac: Texture, Fertility, and pH for Big, Flavorful Roots
- When to Plant Celeriac: Spring and Fall Timing for Every Climate
- How to Start Celeriac From Seed Indoors: Germination, Light, and Transplant Tips
- How to Harden Off and Transplant Celeriac Seedlings
- How to Space and Thin Celeriac Plants for Large, Uniform Roots
Care, Feeding & Watering
- How to Water Celeriac for Steady, Even Root Growth
- Fertilizing Celeriac: Compost, Organic Feeds, and Midseason Boosts
- How to Mulch Celeriac to Retain Moisture and Prevent Weeds
- How to Grow Celeriac in Containers: Soil Mix, Pot Size, and Care Tips
- Common Celeriac Growing Problems and How to Solve Them (Leaf Drop, Small Roots, Slow Growth)
Pests, Diseases & Natural Controls (Combined)
- Celeriac Pests and Diseases: Prevention, and Natural Controls
- How to Keep Celeriac Healthy: Crop Rotation, Soil Renewal, and Garden Sanitation
Harvesting, Storing & Preserving (Combined)
- How to Harvest, Cure, and Store Celeriac for Winter Use
- How to Preserve Celeriac: Freezing, Drying, and Long-Term Storage Options
- Five Ways to Cook and Serve Celeriac
- What to Do With Celeriac: Kitchen Uses, Soups, Salads, and Root-Vegetable Mixes
Companions, Varieties & Garden Planning