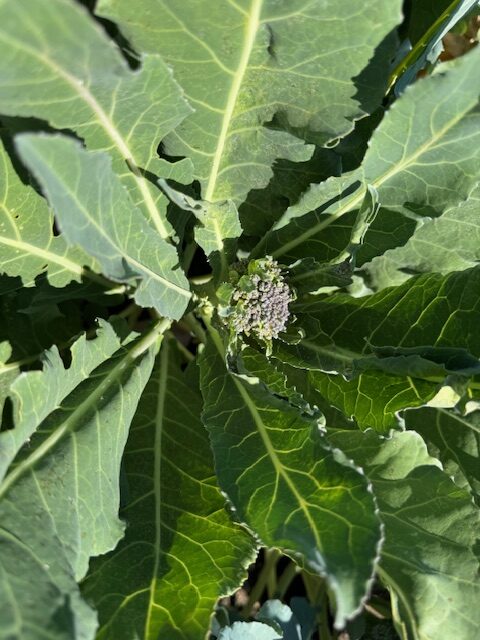
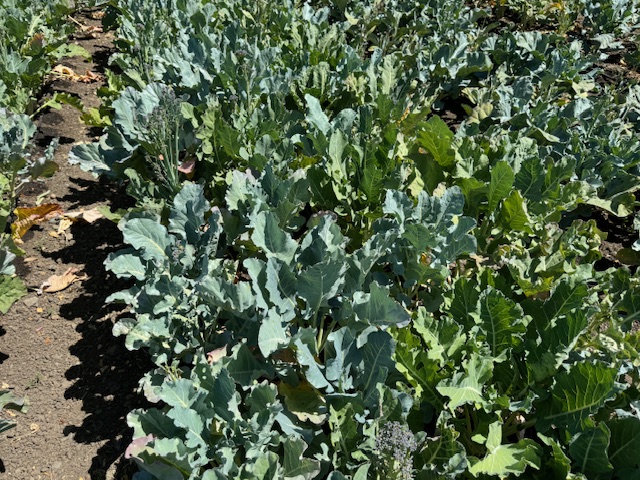
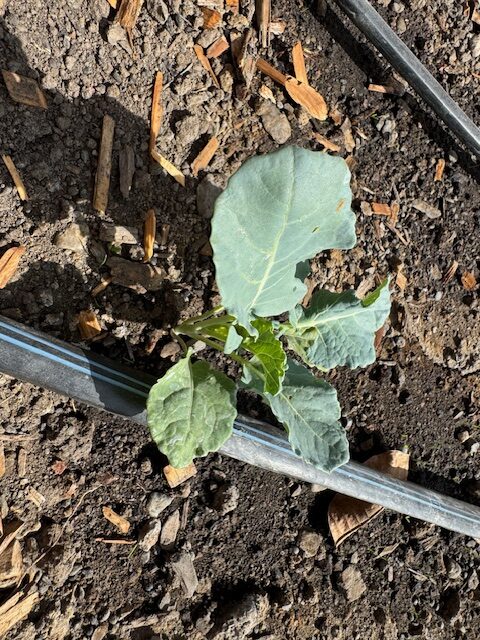
Broccolini, sometimes known as “baby broccoli,” is a hybrid vegetable that combines the qualities of broccoli and Chinese kale (gai lan). It features long, slender stems, small florets, and tender leaves, making it visually distinct from standard broccoli. The flavor is milder and sweeter, with a slight peppery note, and the entire plant is edible, including the stems, florets, and leaves.
Its combination of delicate flavor and versatility makes broccolini a great addition to any garden and kitchen.
When to plant broccolini
- Broccolini is a cool-weather crop that grows best in moderate temperatures. It thrives in temperatures between 60 to 75°F (15-24°C). The ideal planting times are:
- Start seeds indoors 6 to 8 weeks before the last expected frost for a spring crop, or 10 to 12 weeks before the first expected frost for a fall crop.
- Spring Planting:
- Start seeds indoors 6-8 weeks before the last expected frost date.
- Transplant seedlings outdoors 2-4 weeks before the last frost, once they are 4-6 weeks old and have at least two sets of true leaves.
- Fall Planting:
- Start seeds indoors 10-12 weeks before the first expected frost.
- Transplant seedlings outdoors 6-8 weeks before the first frost for a fall harvest.
- In regions with mild winters, broccolini can also be planted in late fall for a winter harvest, as it can tolerate light frosts. However, extremely hot weather can cause it to bolt, or go to seed, which affects the flavor and texture.

Where to plant broccolini
- The soil should be rich, well-drained, and have a pH between 6.0 and 7.0.
- Amend the soil with compost or well-rotted manure to improve fertility.
- The best place to plant and grow broccolini should meet the following conditions for optimal growth:
- Sunlight:
- Choose a spot that receives full sun, with at least 6-8 hours of direct sunlight daily. This encourages healthy growth and abundant production.
- In hotter regions, providing some afternoon shade can help prevent heat stress, especially during late spring planting.
- Soil:
- Well-drained soil is essential to avoid waterlogging, which can lead to root rot.
- The soil should be rich in organic matter and loamy, with a pH between 6.0 and 7.0. Adding compost or well-rotted manure before planting can improve soil fertility.
- If the soil is heavy clay or sandy, amending it with compost or organic matter will help improve texture and drainage.
- Spacing and airflow:
- Plant broccolini in a location with adequate space to allow for proper air circulation. Space plants 12-18 inches apart in rows that are 24-30 inches apart.
- Good airflow helps reduce the risk of fungal diseases.
- Watering:
How to plant broccolini
Starting seeds indoors:
- Timing: Start broccolini seeds indoors 6-8 weeks before the last expected frost for a spring crop or 10-12 weeks before the first frost for a fall crop.
- Seed depth: Sow the seeds ¼ inch deep in seed-starting trays or pots filled with a light, well-draining seed-starting mix.
- Watering: Keep the soil moist but not waterlogged. Mist the surface gently to avoid disturbing the seeds.
- Light: Provide the seedlings with 14-16 hours of light daily using grow lights or placing them in a sunny windowsill.
Transplanting seedlings outdoors:
- Timing: Transplant seedlings when they are 4-6 weeks old and have at least two sets of true leaves. For spring planting, this should be 2-4 weeks before the last frost, while for fall planting, it should be 6-8 weeks before the first frost.
- Hardening off: Before transplanting, harden off the seedlings by gradually exposing them to outdoor conditions over 7-10 days. Start with a few hours of outdoor exposure each day, gradually increasing the time.
Preparing the planting Sste:
- Spacing: Space the plants 12-18 inches apart, with rows 24-30 inches apart to allow enough room for growth and airflow.
- Soil preparation: Amend the soil with compost or well-rotted manure to improve fertility. Ensure the soil is well-draining and has a pH of 6.0-7.0.
Transplanting steps:
- Dig holes: Make holes that are slightly larger than the root ball of the seedlings.
- Plant depth: Place the seedlings in the holes at the same depth they were growing in their containers. Avoid burying the stem too deep.
- Backfill and firm soil: Fill in around the roots with soil, gently firming it to remove air pockets.
- Watering: Water the transplants thoroughly to help settle the soil and establish the roots.
Post-transplant care:
- Mulching: Apply a layer of mulch to help retain moisture, keep the roots cool, and suppress weeds.
- Protection: Use row covers if frost is expected or to protect young plants from pests.

Watering Broccolini
Consistent moisture:
- Broccolini needs consistent moisture to grow well. The soil should be kept evenly moist but not soggy. Aim for about 1-1.5 inches of water per week, including rainfall.
Watering technique:
- Water at the base of the plants to keep the foliage dry, reducing the risk of fungal diseases. Avoid overhead watering if possible.
- Drip irrigation or soaker hoses are effective ways to water broccolini, providing a slow and steady supply of moisture directly to the soil.
Mulching:
- Apply a layer of mulch (such as straw, compost, or shredded leaves) around the plants. This helps retain moisture, regulate soil temperature, and reduce weed growth.
Adjusting watering frequency:
- In warmer weather, you may need to water more frequently to prevent the soil from drying out.
- Avoid waterlogged soil, as this can cause root rot.
Feeding broccolini
Soil preparation:
- Before planting, amend the soil with compost or well-rotted manure to boost fertility. This provides an initial supply of nutrients.
Fertilizer type:
- Broccolini benefits from a balanced fertilizer with an N-P-K ratio of 10-10-10 or higher nitrogen content (like 16-8-8) to support leaf and stem growth.
- Alternatively, use organic fertilizers such as fish emulsion, blood meal, or compost tea.
Fertilizing schedule:
- At planting time: Apply a slow-release fertilizer or side-dress the planting area with compost.
- Mid-season feeding: About 3-4 weeks after transplanting, apply a side-dressing of fertilizer or a liquid feed (like diluted fish emulsion). Repeat this every 3-4 weeks during the growing season.
Avoid over-fertilizing:
- Excessive fertilizer, especially nitrogen, can lead to excess leafy growth at the expense of florets. Stick to recommended amounts and schedules.
Broccolini pests and diseases
Common pests
Aphids
- Description: Small, soft-bodied insects that cluster on stems, leaves, and flower buds. They suck plant sap, causing yellowing, curling, or stunted growth.
- Treatment:
- Blast with water to dislodge aphids from the plant.
- Apply insecticidal soap or neem oil to affected areas.
- Introduce beneficial insects like ladybugs or lacewings, which are natural predators of aphids.
Cabbage Worms (including Cabbage Loopers and Imported Cabbageworms)
- Description: Green caterpillars that feed on the leaves, causing holes and damage.
- Treatment:
- Hand-pick caterpillars off the plants.
- Use a biological insecticide containing Bacillus thuringiensis (Bt), which specifically targets caterpillars.
- Cover plants with row covers to prevent moths from laying eggs on the leaves.
Flea Beetles
- Description: Small, black, or brown beetles that create tiny holes in the leaves.
- Treatment:
- Use row covers to protect seedlings from flea beetles.
- Apply a sticky trap or diatomaceous earth around plants to deter beetles.
- In severe cases, consider using spinosad or pyrethrin-based insecticide.
Slugs and Snails
- Description: These pests chew irregular holes in the leaves, especially during wet conditions.
- Treatment:
- Set out slug traps (like shallow dishes of beer) to attract and drown them.
- Apply iron phosphate-based slug bait around the base of plants.
- Use a barrier of crushed eggshells or diatomaceous earth to deter slugs.
Common Diseases
Downy Mildew
- Description: Fungal disease causing yellow patches on the upper leaf surfaces and a fuzzy white or gray growth on the undersides.
- Treatment:
- Avoid overhead watering to keep the foliage dry.
- Space plants adequately to ensure good airflow.
- Apply fungicides containing copper or sulfur to affected areas.
Clubroot
- Description: Soil-borne disease that causes swollen, deformed roots and stunted growth. Affected plants may wilt during the day even when the soil is moist.
- Treatment:
- Rotate crops by avoiding planting any brassicas (e.g., broccoli, cabbage) in the same spot for at least 3-4 years.
- Adjust soil pH to above 7.2 by adding lime, as clubroot thrives in acidic soil.
- Remove and dispose of affected plants (do not compost).
Black Rot
- Description: Bacterial disease that causes yellow V-shaped lesions on the leaves, eventually leading to leaf drop and plant death.
- Treatment:
- Use certified disease-free seeds or transplants.
- Remove infected plants to prevent the spread of bacteria.
- Rotate crops and avoid planting in contaminated soil for a few years.
Powdery Mildew
- Description: White, powdery fungal growth on the upper surface of leaves, causing them to turn yellow and dry out.
- Treatment:
- Prune affected leaves and ensure good airflow around plants.
- Apply a fungicidal spray such as sulfur or potassium bicarbonate.
- Water at the base of plants to keep foliage dry.

Harvesting broccolini
- Broccolini is ready to harvest about 60 to 90 days after planting.
- Cut the stems when they are 6 to 8 inches long, and the heads are tight and unopened. Side shoots will continue to produce after the main stem is harvested, allowing for multiple harvests.
- When harvesting broccolini, you can harvest the entire top portion of the plant, including:
- Stems: The long, tender stems are entirely edible and can be harvested at about 6-8 inches in length.
- Florets: The small, loosely packed florets at the top of the stems should be tight and unopened when harvested.
- Leaves: The tender leaves attached to the stems are also edible and can be included in your harvest.
- Harvesting can be done by cutting the main stem with a sharp knife or garden shears, leaving a few inches of the base. This encourages the plant to produce side shoots for additional harvests over time.
Broccolini varieties and cultivars
There aren’t many distinct varieties of broccolini like there are with other vegetables, but there are a few different types or cultivars that have been developed, each with subtle differences in flavor, appearance, and growing habits:
Aspabroc:
- This is the original variety of broccolini and the most commonly available. It was developed as a hybrid between broccoli and Chinese kale (gai lan) and introduced in the 1990s.
- Features long, thin stems with small, loosely packed florets and tender leaves.
- Known for its mild, sweet, and slightly peppery taste.
- Aspabroc has a slightly shorter growing season compared to other varieties, making it well-suited for multiple harvests.
Happy Rich:
- This variety is similar to Aspabroc but has thicker stems and larger leaves.
- It tends to produce more side shoots, allowing for continuous harvesting over a longer period.
- Happy Rich has a flavor that is a bit more robust than other broccolini types, making it a favorite for stir-fries and sautéing.
- The plants can tolerate slightly warmer temperatures, which makes it suitable for both spring and fall planting.
Atlantis:
- Known for having darker green leaves and slightly larger florets than Aspabroc.
- The flavor is mild and sweet, with a bit more crunch due to its thicker stems.
- Atlantis is highly resistant to bolting, meaning it performs well in fluctuating temperatures, making it a reliable choice for varied climates.
Bellstar:
- A newer variety, Bellstar broccolini is bred for a high yield and vigorous growth.
- It has thicker stems and larger heads, making it more similar in appearance to traditional broccoli but with the tender qualities of broccolini.
- The flavor is sweet, with a hint of nuttiness, and it performs well when grown in cooler conditions.
These broccolini varieties all share the characteristic tender stems, sweet flavor, and adaptability in the kitchen, while offering slight differences in growth patterns, size, and resistance to environmental stresses.
Using broccolini in the kitchen
Broccolini’s tender texture and sweet flavor make it versatile in the kitchen. Here are some popular ways to use it:
- Sautéed: Quickly sauté with garlic, olive oil, and a pinch of chili flakes for a simple side dish.
- Roasted: Drizzle with olive oil, salt, and pepper, then roast in the oven at 425°F (220°C) for about 15-20 minutes until crispy.
- Stir-Fried: Add to stir-fries with other vegetables, meat, or tofu. Its tender stalks cook quickly and absorb flavors well.
- Blanched or Steamed: Blanch or steam until tender, then dress with lemon juice or a light vinaigrette for a fresh, healthy side.
- Pasta or Grain Bowls: Incorporate broccolini into pasta dishes, grain bowls, or salads for added color and nutrients.


